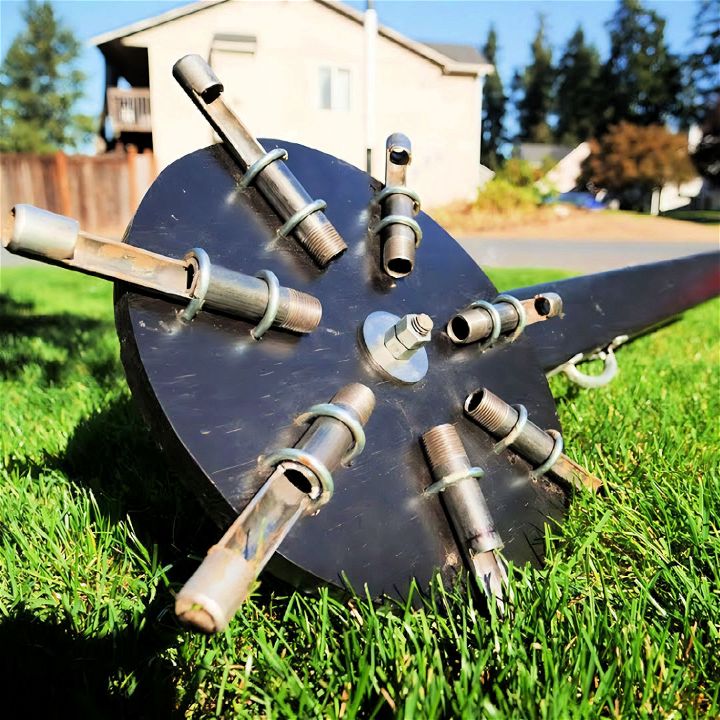
Are you tired of looking at your compacted lawn, knowing it needs a breath of fresh air to thrive? What if I told you that you could build your own DIY lawn aerator for just about $160? Yes, you read that right! With a trip to your local hardware store and some elbow grease, you can DIY your way to a healthier lawn. Let’s dive into the steps to make an effective homemade lawn aerator, as demonstrated by Albert in his insightful DIY guide.

Lawn Health
Maintaining a healthy lawn goes beyond regular watering and mowing. One crucial aspect often overlooked is aeration, a process that allows your lawn to breathe and absorb essential nutrients effectively. Aeration combats soil compaction, which can suffocate grass roots and hinder growth, leading to a lackluster lawn.
Why Aeration Matters
Imagine trying to breathe with a heavy blanket over you—that’s what compacted soil feels like to your lawn. Compacted soil prevents air, water, and nutrients from reaching the root system, causing your grass to struggle and potentially leading to dead spots or thinning. Aeration involves perforating the soil with small holes to reduce density and allow life-giving elements to reach the roots.
Benefits of Aeration
Aerating your lawn has several benefits:
- Relieves Soil Compaction: Aeration breaks up the compacted soil, making it easier for roots to grow and access water, air, and fertilizer.
- Thatch Management: Thatch is a layer of organic matter that can block moisture and nutrients. Aeration helps manage thatch by removing some of it and promoting microbial activity that decomposes the rest.
- Enhances Nutrient Uptake: By allowing nutrients to penetrate deeper into the soil, aeration ensures they reach the root zone where they’re most needed.
- Improves Soil Structure: Aeration can modify the soil pH to optimal levels for grass growth, helping your lawn absorb more nutrients from fertilization.
Understanding Aeration
Aeration is not just poking holes in the ground; it’s about creating a healthier environment for your lawn. There are two main types of aeration:
- Spike Aeration: This method uses a tool to poke holes in the ground. It’s simple and effective for small areas.
- Plug Aeration: This technique removes small cores of soil from the lawn, which is more effective for relieving compaction and managing thatch.
When to Aerate
The best time to aerate is during your lawn’s growing season when the grass can heal and fill in any open areas after soil plugs are removed. For cool-season grasses, early spring or fall is ideal. For warm-season grasses, late spring through early summer is the best time.
DIY Aeration Techniques
You can aerate your lawn yourself using manual tools like a garden fork or you can build a specialized aeration tool. For larger lawns, machine aerators can be rented. The key is to ensure the soil is moist but not saturated, which makes the aeration process easier and more effective.
How to Make a Lawn Aerator
Discover how to make a DIY lawn aerator in this easy step-by-step guide to improve your lawn’s health and beauty with this cost-effective project!
What You’ll Need:
- A 13-inch diameter wheel.
- Half-inch drill bits.
- Steel piping.
- A grinding disc.
- U-bolts and nuts.
- Dremel tool (optional but recommended).
- Measuring tape.
- 2×4 wood for handles and spacers.
- Screws and washers.
- Weights (30-50 lbs. depending on your lawn’s needs).
- Lubricant for maintenance.
Step-by-Step Guide:
Learn how to make a homemade lawn aerator with our easy step-by-step guide below:
Preparing the Wheel and Tines
- Cut your wheel into a 13-inch diameter circle.
- Use a half-inch drill bit to drill a center hole in the wheel.
- Divide the wheel into seven equal sections, aligning each with the center hole for even tine placement.
- For your tines, cut steel piping in half, grind one end to smooth it for better soil penetration, and drill an opening for the cores to exit.
Assembling the Aerator
- Mark your tines for a two-inch cutting point and align U-bolts an inch and a half from each cut.
- Drill holes for the U-bolts, gently hammer them in place, and hand tighten the nuts.
- Ensure all tines are facing the same direction and protruding two inches outward for consistent core depth.
- Optional: Use a Dremel tool to smooth out contact surfaces and jagged areas.
- Measure and cut a 2×4 to create a handle (about four and a half feet long) and the handlebars (21.5 inches long).
Finishing Touches
- Attach the handle and handlebars securely with screws, ensuring a tight fit.
- Create a 4×4 inch spacer for stability, avoiding contact with U-bolts.
- For assembly, you’ll only need basic tools like a screwdriver and wrench.
- Attach the weights based on personal preference; around 30-50 lbs. should suffice, evenly distributed for balance.
- Prep your lawn by watering it 3-4 days prior to aeration, detaching, and mowing slightly shorter than usual.
Maintenance
- Clean out tines before each use to ensure smooth operation.
- Apply lubricant to the fender washers and tines for easier cleaning and maintenance.
Video Tutorial
For a visual step-by-step guide, watch Albert’s video on making your own lawn core aerator here.
It pairs well with this written guide, enhancing your understanding of the procedure by illustrating the techniques discussed in an accessible format.
Advanced Tips for Aeration
Aeration is a key step in maintaining a lush, healthy lawn. Here are some advanced tips to ensure you get the most out of this process:
- Timing is Everything: The ideal time for aeration is during the growing season when the grass can recover quickly. For cool-season grasses, this means early spring or fall. For warm-season grasses, late spring to early summer is best.
- Depth Matters: Aim for holes about 2-3 inches deep to effectively relieve soil compaction and promote root growth.
- Overlap Passes: When using a core aerator, overlap your passes to ensure thorough coverage and avoid missed spots.
- Leave the Plugs: Allow the soil plugs pulled from the aeration process to decompose naturally on the lawn. They contain beneficial microorganisms that help break down thatch.
- Water Wisely: After aeration, water your lawn to help the grass recover and to wash soil plugs into the holes, further improving soil structure.
Frequently Asked Questions (FAQs)
Here are some common questions about DIY lawn aeration:
- How often should I aerate my lawn? Most lawns benefit from aeration at least once a year. Lawns with heavy clay soil or high foot traffic may need it more frequently, potentially twice a year.
- Is it okay to aerate a wet lawn? Aerate when the soil is moist but not soaked. Aeration on overly wet soil can lead to further compaction.
- Should I overseed after aerating? Yes, overseeding post-aeration can improve grass density as seeds settle into the holes, enhancing soil contact and germination.
- Will aeration fix a waterlogged lawn? Aeration can improve drainage and reduce waterlogging by allowing water to flow into the soil more freely.
- What should I do with the soil plugs after aeration? Leave the soil plugs on the lawn to decompose naturally. They contain beneficial microorganisms that help break down thatch.
- Can aeration damage underground utilities? Most utility lines are buried deep enough to avoid damage from aeration. However, items like sprinkler systems could be impacted, so it’s best to flag these before starting.
Conclusion
Building your own DIY lawn core aerator doesn’t just save you money—it’s a rewarding DIY project that benefits your lawn considerably. Happy building, and here’s to a healthier, more vibrant lawn!


