In today’s fast-paced and space-conscious world, maximizing the utility of every furniture piece in our homes is not just a luxury, it’s a necessity. Whether you live in a compact apartment, are looking to furnish a guest room, or simply want a versatile piece of furniture that can serve dual purposes, a DIY sofa bed is a fantastic project.
This guide will walk you through the process of making a sofa that doubles as a bed, addressing common challenges and offering unique tips and solutions. By the end, you’ll not only have a multifunctional furniture piece but also the satisfaction of having built it yourself.
Prioritizing Your Needs and Materials
Before diving into the DIY pull out sofa bed project, it’s essential to consider what you’ll need. Here’s a breakdown of materials and why each is vital:
- Lumber: The backbone of your sofa bed. Choose quality, sturdy lumber as it will dictate the durability of your furniture.
- Dowels and Wood Glue: For joining pieces of wood. Dowels provide stability, while wood glue ensures a tight bond.
- Clamps: Necessary for holding wood pieces together while the glue dries.
- Sander and Sandpaper: To smooth out rough edges and surfaces, ensuring your sofa bed is pleasant to touch and free from splinters.
- Finishing Oil or Paint: This will protect the wood and enhance its appearance, aligning it with your room’s aesthetics.
- Screws and a Drill: For assembling parts that require more strength and for attaching movable sections.
- Cushions: The trickiest part, as finding the right size can be challenging. Options include custom-made cushions, patio furniture cushions, or a futon mattress.
Building Your DIY Sofa Bed: Step-by-Step Instructions
Learn how to build your own DIY sofa bed with step-by-step instructions below:
Step 1: Cutting the Lumber
Begin by cutting all the lumber to the required sizes. While a miter saw speeds up the process, a circular saw works just fine. Accuracy is key, so measure twice, cut once.
Step 2: Assembling the Frame
Use dowels and wood glue to assemble the frame. Start with the back and arms of the sofa, ensuring all pieces fit snugly. Clamps are essential here to keep everything tight while the glue sets.
Step 3: Sanding and Finishing
Once the frame is assembled and the glue has dried, start sanding. Progress from coarser grits to finer, aiming for a smooth finish. Apply your chosen finish (oil or paint) to protect the wood and enhance its look.
Step 4: Adding Support Slats
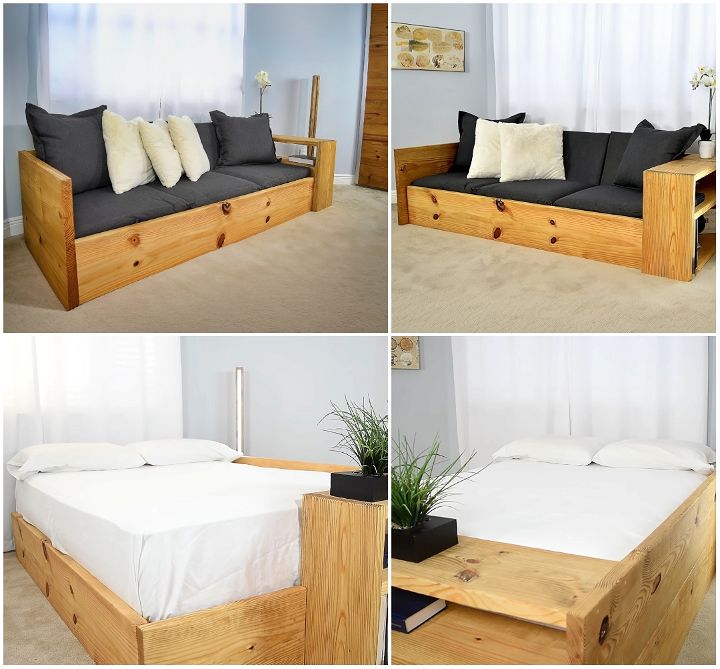
For the bed function, you’ll need to add slats to the base. Ensure they’re evenly spaced and securely attached. Skipping every other slat will allow for the pull-out feature to work correctly.
Step 5: Creating the Pull-out Mechanism
The pull-out feature is what transforms the sofa into a bed. Attach a front piece that can slide out, and add more slats to this piece. Use wood glue and screws for additional strength.
Step 6: Cushions and Final Touches
Finding or making cushions that fit can be challenging. Consider using a combination of patio furniture cushions or a futon mattress. Test different arrangements to find what works best for you.
Video Tutorial
For a visual demonstration, watch this step-by-step video tutorial on YouTube:
It provides clear instructions and tips, making it a perfect companion to this guide.
DIY Sofa Bed: Customization is Key
Discover how to make your own custom DIY sofa bed using our guide.
Why Customize?
Sure, you’re following a great guide, but a DIY sofa bed is where your personality and needs really shine! Don’t be afraid to make it your own. Here’s why customizing matters:
- The Perfect Fit: Maybe your space is small, or maybe you want a giant sofa bed for movie nights! Adjusting the plans means you get exactly the size you need.
- Your Style, Your Rules: Love bold colors? Classic neutrals? The fabric and design details let you express your taste.
- Storage Solutions: Build-in drawers under the seat? A hidden shelf behind the back cushions? Decide what kind of storage will work best for you.
- Skill Level: If you’re new to DIY, a simple design is a great start. More experienced? Add fancy armrests or a unique folding mechanism.
How to Make Changes
- The Big Picture: Start by deciding what’s MOST important to you – size, style, added features. This guides your changes.
- Measure & Sketch: Measure your space and make a rough sketch of your ideal sofa bed. Don’t worry if it’s messy, it’s just for you!
- Simple Swaps: Changing the fabric is an easy way to customize the look. Upgrading the hardware (hinges, handles) gives it a polished feel.
- Ask for Help: If you’re unsure about making changes to the building plan, a quick chat with someone experienced at a hardware store or an online DIY forum can be really helpful.
Remember: There are no wrong answers! The awesome thing about DIY is making it work for you.
FAQs on Building Your Own DIY Sofa Bed
Here, I address common questions about building a DIY sofa bed.
What materials do I need to start my DIY sofa bed project?
You’ll need quality lumber, dowels, wood glue, clamps, a sander with sandpaper, finishing oil or paint, screws, a drill, and cushions. Each material plays a critical role in ensuring the durability and aesthetics of your sofa bed.
How can I ensure the lumber I choose is suitable for my project?
Look for sturdy, quality lumber. It’s the backbone of your project, so its durability is essential. Depending on your project, hardwoods like oak or maple can be excellent for their strength, while softer woods like pine can be easier to work with but may not be as durable.
What’s the best way to join pieces of wood?
Using dowels and wood glue together is a reliable method. Dowels provide stability and strength, while wood glue ensures a tight and seamless bond. This combination is particularly effective for furniture that will bear weight, like a sofa bed.
How do I ensure the frame is sturdy?
Clamp the wood pieces together tightly while the glue dries to ensure a secure bond. For areas requiring extra strength, like the base that will support weight, consider using screws in addition to glue.
What sandpaper grit should I start with?
Begin with a coarser grit to remove any rough spots and imperfections, then gradually work your way up to finer grits for a smooth finish. Starting around 80 grit and moving up to 220 or higher is a common progression.
How do I protect and enhance the wood’s appearance?
Apply a finishing oil or paint after sanding. This not only protects the wood from wear and moisture but also gives it a polished look that can match your room’s aesthetic.
How can I make the bed function more comfortable?
The key lies in the choice of cushions. You might opt for custom-made cushions, patio furniture cushions, or a futon mattress. Ensure they provide enough support and comfort for both sitting and sleeping.
What’s the trick to evenly spacing support slats?
Measure the total length of the area where the slats will go and divide it by the number of slats plus one (for the spaces in between). This gives you the spacing measurement. It’s crucial for comfort and support.
Can I add a pull-out mechanism to any sofa design?
Yes, with some modifications. The design should allow space for a pull-out frame. This might involve adding a second layer of slats on a sliding mechanism. It requires precise measurement and some additional hardware but is doable for most sofa designs.
Is building a DIY sofa bed cost-effective?
Yes, especially if you have some of the tools and materials already. Buying a multifunctional furniture piece can be expensive, so building it yourself can save money and allow for customization to fit your exact needs and space.
Conclusion
Building your own DIY sofa bed can be a rewarding project, not only for the practical benefits but also for the sense of accomplishment it brings. By following these detailed steps and watching the accompanying video, you’ll be well on your way to creating a beautiful, functional piece of furniture that meets your needs and reflects your craftsmanship. Happy building!
Share on Pinterest
Ready to step up your furniture game? Pin this DIY sofa bed tutorial now!


