If you’re planning to welcome a litter of puppies soon, setting up a whelping box is an important step, and making one yourself is cost-effective. A DIY whelping box provides a safe and cozy space for a mother dog to give birth and care for her puppies during their first few weeks of life. Crafting one can seem challenging, but with the right guidance, it’s definitely doable.
For those with larger breeds, a specialized DIY whelping box for large dogs ensures that space won’t be an issue and the mother can comfortably accommodate her growing pups. Plus, understanding how to build a whelping box from scratch allows for customization to meet your specific needs.
Ready to build a nurturing environment for the new additions? Let’s get started on how you can make this essential item yourself.

The Importance of a Whelping Box
For anyone who’s ever witnessed the miracle of puppies coming into the world, you know it’s an event that’s as heartwarming as it is messy. It’s a moment that needs preparation, care, and above all, a safe environment. This is where the whelping box comes into play, a hero in its own right, though not everyone may be familiar with its critical role.
A whelping box is more than just a container; it’s a secure, dedicated space designed specifically for mother dogs to comfortably give birth and care for their newborn puppies. Its importance cannot be overstated, both for the safety of the puppies and the well-being of the mother.
Protecting Puppies and Mother
The journey of birth is delicate. Newborn puppies are vulnerable, relying on their mother and a safe environment to survive their first weeks of life. The whelping box acts as a fortress, safeguarding them from external threats, including accidental injuries from other pets or overly curious children. For the mother, this space provides a stress-free zone where she can focus on delivering and nursing her puppies without disturbances, reducing the risk of complications during and after birth.
A Safe, Dedicated Birthing and Rearing Space
Think of a whelping box as a nursery designed with the canine family in mind. It’s their personal space, where they can bond, grow, and thrive during the critical early stages. This dedicated area helps confine the mess of birth and subsequent feeding to one manageable spot, making it easier to maintain a clean environment for the puppies and the mother. It also serves as a training ground, where puppies begin to learn about boundaries and the world around them in a controlled, safe manner.
Maintaining Warmth and Sanitation
In the wild, mother dogs seek out secluded, warm spots to birth their young. The whelping box replicates this environment, providing insulation and warmth essential for the puppies’ survival, who are unable to regulate their body temperature for the first few weeks. Moreover, it allows for the easy change of bedding to maintain cleanliness, reducing the risk of infections and promoting a healthy start for the puppies.
DIY Whelping Box: Tailored for Every Dog Size
Creating a DIY whelping box can be a rewarding project that ensures the safety and comfort of your dog during birthing. The key to success lies in customization to fit your dog’s size and the inclusion of essential safety features.
Addressing Different Dog Sizes
Size Matters! The size of your whelping box should be tailored to your dog to ensure she has enough space to move around and care for her puppies comfortably. Here’s how to get it right:
- For Smaller Breeds: Smaller dogs will need a cozier space to feel secure. Consider a box that is at least 4 feet by 4 feet. However, don’t make it too small; your dog should be able to stretch out and turn around comfortably. Use thinner plywood for walls to make the box light and easy to move.
- For Larger Breeds: Larger breeds require more space and stronger materials. Aim for a box that’s at least 5 feet by 5 feet, with reinforced corners and thicker walls to support the weight. Plywood of at least 3/4 inch thickness is recommended for these larger, heavier boxes.
- Determining Dimensions: To find the perfect size, measure your dog’s length from nose to base of the tail and add about a foot. This ensures she can lie down and stretch out comfortably. The height of the walls should be tall enough to safely contain the puppies, but allow the mother to easily step over.
Safety Features
Safety is paramount in a whelping box. These features are non-negotiable for the well-being of the mother and her puppies.
- Puppy Rails: Also known as pig rails, these are essential to prevent the mother from accidentally laying on her puppies. Install rails 4 inches off the floor and 6 inches away from the walls all around the inside of the box. Use smooth, rounded dowels or PVC pipes for these rails.
- Non-Toxic Finishes: Choose materials and finishes that are safe for newborn puppies. Avoid paints and varnishes with high VOC levels; instead, opt for natural, non-toxic options or leave the wood bare. Always ensure the box is fully aired out before introducing your dog and her puppies.
- Rounded Corners and Edges: To prevent injuries, round off all corners and edges. You can use sandpaper to smooth out wooden surfaces. Consider adding soft padding or edge guards for extra safety.
- Heat Regulation: Maintaining the right temperature is critical, especially in colder climates. While heating pads can be used, they must be covered properly to avoid direct contact with the puppies. Another option is installing a heat lamp above one corner of the box, ensuring it’s not too close to cause overheating or burns. Always provide a cooler area in the box so the puppies can move away if they get too warm.
Now that you understand the importance, sizes, and safety aspects of a DIY whelping box, let’s move on. We have prepared three different tutorials with step-by-step instructions to help you build your own.
1. DIY Whelping Box
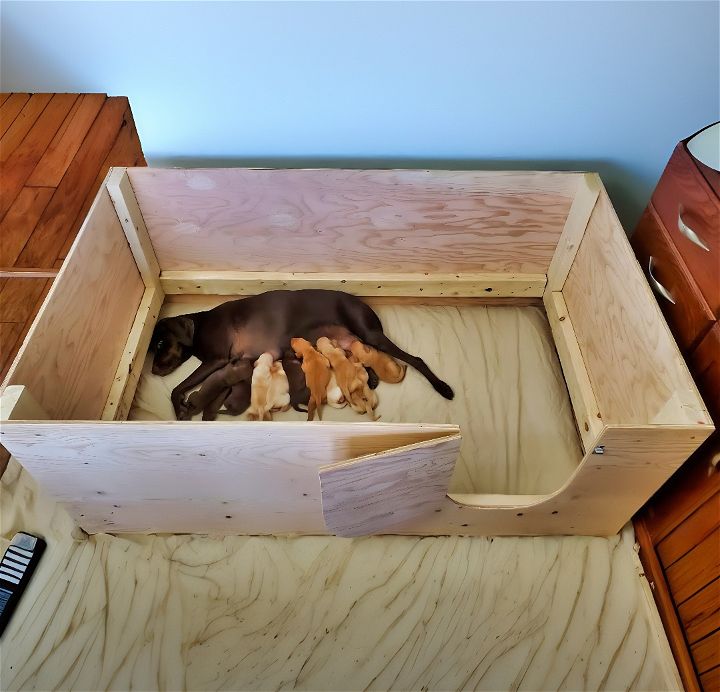
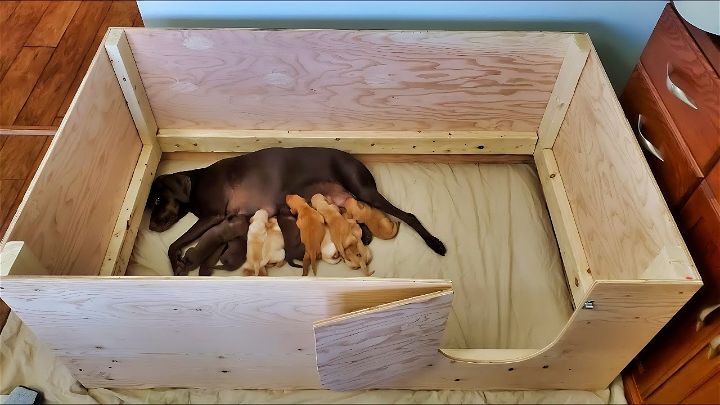
Building a DIY whelping box for your pregnant dog can be a straightforward and rewarding DIY project. Having whelped several litters, I’ve come to appreciate the value of a secure, comfortable place for a mother to give birth and care for her puppies. This guide, inspired by practical experience and the shared expertise in the provided video tutorial, aims to make the process as simple and efficient as possible for you.

Materials Explained:
- One 4×8 sheet of plywood: The foundational material for the walls of the box. Its size allows for ample space for the mother and her puppies.
- Three 2x4s: These will serve as the frame providing structural support and also creating a barrier to prevent puppies from being accidentally squished by their mom.
- 1.5-inch screws: These will hold the structure securely together.
- Two hinges and a bolt latch: For creating a door that lets the mother in and out while keeping the puppies safely inside.
- Half-inch screws (for hinges and latch): Ensures the door fixtures are firmly attached without the screws poking through the plywood.
Tools Required:
- Saw (hand saw or power saw)
- Screwdriver or drill
- Measuring tape
- Pencil for marking
- Jigsaw (for cutting the door)
- Sandpaper (optional, to smooth edges)
Step-by-Step Construction:
1. Preparing the Plywood and Frame:
- Cut your 4×8 sheet of plywood in half, creating two equal pieces for the sides of the box. This size is generally suitable for most breeds but adjust according to the size of your dog.
- Next, measure and cut your 2x4s: two should be cut to the length of the plywood for the sides, and four shorter pieces (around 20.5 inches but based on your plywood cuts) will serve as supports to prevent the puppies from being trapped underneath their mother.
2. Assembling the Base:
Attach the 2×4 supports to the inside edges of your plywood pieces, ensuring they are smoothly fastened and flush to avoid any gaps where puppies might accidentally get stuck.
3. Erecting the Walls:
Stand up the plywood pieces and join them at the corners by screwing them into the 2×4 frame. The structure should now start to resemble a box.
4. Adding the Safety Rails:
Install the remaining 2x4s around the interior, a few inches off the base. These will act as safety rails, creating a space that prevents puppies from being squished against the wall by their mother.
5. Making the Door:
For the entrance, draw and cut out a semicircle on one side of the box, ensuring it’s high enough from the base so puppies can’t escape. Installing hinges and a bolt latch will make the door functional.
6. Finishing Touches:
- Sand down any rough edges to prevent splinters.
- Consider placing a removable, washable floor like linoleum or a large piece of vinyl for easy cleanup.
Beyond the Basics:
- Adjustability: As puppies grow, they’ll become more adventurous. You can modify the box by adding removable sections or adjustable walls to accommodate their changing needs.
- Portability: Think about adding wheels to one side (ensure they lock) for easier movement, especially useful when you need to clean or change the location of the box.
- Comfort: Line the box with soft blankets or specific whelping mats that are easy to wash and provide warmth for the puppies.
Common Pitfalls to Avoid:
- Not Sanitizing Properly: Hygiene is crucial in a whelping box. Choose materials that are easy to clean and disinfect.
- Ignoring Potential Escape Routes: Puppies are curious and will find ways to escape. Ensure all gaps are sealed, and the door latch is secure.
Troubleshooting:
If the structure wobbles, double-check that all screws are tight and that the frame is square. For issues with puppies escaping, increase the height of the walls, or add a puppy-proof top until they are old enough to have supervised free roam.
Video Tutorial:
For a visual breakdown of these steps, watch the detailed video tutorial on YouTube here. This guide complements this article by showing each step in action.
Building a whelping box is not just about creating a space for birth; it’s about ensuring the safety and comfort of both the mother and her puppies during their first critical weeks. With careful planning and execution, you can provide a warm, safe environment for the next generation of furry friends.
2. DIY Whelping Box for Large Dogs
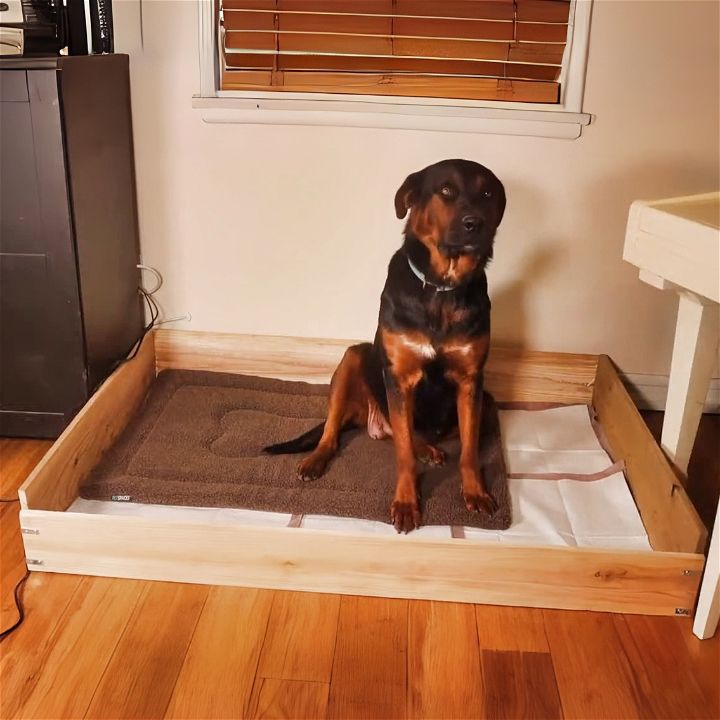
Are you preparing for the arrival of a new litter of puppies and need a safe, cozy place for them to be born and grow during their first weeks? This guide will help build a durable, budget-friendly DIY whelping box for large dogs. Drawing from personal experience and a practical approach, this guide offers unique tips and insights, ensuring your DIY project is successful and meets your specific needs.
This task can be daunting, but with clear instructions and a bit of elbow grease, you’ll have a whelping box ready in no time for around $20.

What Will I Get Out of This?
By following this guide, you’ll learn how to design and construct a whelping box suitable for large breed dogs. This box will provide a safe, contained space for birthing and raising puppies. In addition to saving money, crafting this box yourself allows customization to fit your dog’s size and comfort and enjoy the fulfillment of a successful DIY project.
Materials Explained
- Large Picket Fence Panels: Chosen for their affordability and sufficient size. You’ll need one panel for each side of the box.
- Wood Screws (3/4 inch): Ensure a secure assembly.
- Corner Braces: Provide additional stability to the box corners.
- Wood Glue (Optional): For extra bonding strength.
- Safety Glasses & Gloves: Essential safety gear to protect you during the project.
- Measuring Tape, Ruler, and Marker: For accurate measurements and markings.
- Sandpaper (Optional): Smooth out any rough edges to protect the puppies and mother.
- Drill or Screwdriver: For assembling the panels. A handheld drill makes the job easier, but a screwdriver works too.
- Hand Saw: If you’re cutting the panels yourself. Alternatively, stores like Home Depot can cut them for you.
Steps to Build Your Whelping Box
- Prepare Your Workspace: Choose a well-ventilated area, lay out all your materials, and put on your safety gear.
- Measure and Cut (If Necessary): If not pre-cut, measure your fence panels according to the desired dimensions. For a large breed, a recommended size is 4 feet long by 3 feet wide by sides. Remember, it’s easier to trim excess length than add what you cut short.
- Sand Edges (Optional): Smooth any rough edges on the panels with sandpaper to prevent injury to the dog or puppies.
- Assemble the Box: Lay out the panels in a rectangular shape on the floor. Apply wood glue (if using) to the edges before screwing them together with the wood screws. Secure each corner with corner braces for extra stability.
- Add Extras (Optional): Consider installing “pig rails” inside the box, a few inches off the floor. These prevent the mother from accidentally lying on her puppies.
- Inspect and Final Touches: Once assembled, inspect the box for any sharp edges or loose screws. Fill or sand these as needed to ensure the safety of the mother and her puppies.
Expanding the Scope of Your Guide
- Why Pig Rails? These rails are crucial for large breeds, providing a safety zone for puppies against accidental smothering.
- Troubleshooting: If the box feels wobbly, reinforce the joints with additional screws or corner braces.
- Variations: Consider a removable side for easier access once the puppies begin to explore outside their box.
Video Tutorial
Want a visual demonstration? Watch a step-by-step video tutorial on YouTube here. It provides a clear and easy-to-understand visual walkthrough of the techniques, making it a great companion to this written guide.
Building a whelping box can be affordable and easy. By using basic materials and DIY skills, you can create a cozy space for a new litter.
3. How to Build a Whelping Box
Bringing a new litter of puppies into the world is an exciting and nerve-wracking experience for any dog owner. A whelping box is essential for ensuring the safety and comfort of the mother and her newborn pups during birth and the first few weeks of life. However, commercial whelping boxes can be expensive, costing upwards of $400.
Ken Wignard, featured on the Hallmark Channel, demonstrates an affordable, effective DIY solution. With firsthand experience in crafting and a knack for making user-friendly projects from affordable materials, Ken’s approach to building a DIY whelping box is not only cost-effective but also adaptable to any dog breed.
This guide provides a step-by-step procedure for creating your own whelping box, just like Ken Wignard’s design. You’ll learn unique tips, overcome common challenges, and understand why each step matters, ensuring a safe haven for the newest additions to your family.
What Will I Get Out of This?
By the end of this guide, you’ll know how to:
- Build an affordable, durable whelping box from scratch.
- Protect newborn puppies with a unique safety feature.
- Easily maintain and clean the whelping area.
- Adapt the box size to fit any dog breed.
Materials Needed
- (4) 2ft x 4ft plywood sheets
- PVC pipes (for puppy rails)
- PVC tees and tri-corners
- Wood discs and letters for the entrance lock
- Saw for cutting wood and PVC
- Marker
- Measuring tape
- Sandpaper
Steps to Build the Whelping Box
- Measure and Cut: Start by marking 12 inches down and * ¾ inch wide on each plywood sheet, which accounts for the thickness of the plywood. Cut out two slots on each piece for easy assembly.
- Make the Entrance: Find the center on one plywood piece to draw a half-circle, which will serve as the mother’s entrance. Cut out the circle.
- Assemble the Box: Slide each plywood piece into the corresponding slots of the other plywood pieces. This interlocking design provides stability without the need for nails or screws.
- Secure the Entrance: Attach the wood disc and letter on one side of the entrance. This ingenious solution acts as a simple lock, allowing you to control access to the whelping box.
- Install the Puppy Rails: Cut the PVC pipes to fit around the inner edge of the box. These rails prevent puppies from being accidentally crushed or suffocated by their mother.
Expanding the Scope: Why & How
Learn why it’s essential and how to do it effectively.
Why Puppy Rails?
The addition of puppy rails is a critical safety feature. They create a safe space for puppies, ensuring they’re not trapped or injured by their nesting mother.
Cleaning and Maintenance
Opt for washable bedding instead of newspapers to avoid ingestion of harmful dyes by the puppies. Place a tarp beneath the box for additional floor protection and use blankets or puppy pads inside the box for easy cleaning.
Cost Comparison & Value
Constructing this DIY whelping box only costs around $40, significantly less than commercial alternatives. Besides the savings, the DIY process allows for customization to your dog’s size and the satisfaction of personally ensuring the safety and comfort of the newborn pups.
Video Tutorial
Want a visual demonstration? Watch a step-by-step video tutorial on YouTube:
This guide complements the video by diving deeper into the reasoning behind each step and offering solutions to potential issues, ensuring your success in building a safe, comfortable environment for whelping puppies.
By following the instructions outlined here, you’ll build a nurturing space for your dog and her new litter, improve their chances of healthy development, and provide peace of mind for yourself as a responsible pet owner.
DIY Whelping Box: Personalization and Comfort
Creating a cozy and safe environment for a mother dog to give birth is essential. Here’s how you can ensure the whelping box is not just a place for birthing but a comfortable nest for the mother and her puppies.
Bedding Choices
- Washable vs. Disposable: Washable bedding is eco-friendly and cost-effective over time. Choose materials that are soft and easy to launder. Disposable bedding is convenient, especially for keeping the area clean with minimal effort. However, it’s less eco-friendly and can become costly.
- Warmth: Ensure the bedding material retains heat but is not too bulky, which could risk overheating or suffocation for the newborns.
- Safety Factors: Avoid materials that fray easily or have loose threads, as these could pose a risk to the puppies.
Adding Comfort
- Soft Toys: A soft toy can provide comfort to the mother, especially if it carries the scent of her surroundings before the move to the whelping box.
- Familiar Scents: Adding a blanket or an item with a familiar scent can help the mother settle in more comfortably.
Making a Calm Environment
The whelping area should be away from high traffic areas in your home. A quiet, temperature-controlled space where the mother feels secure is ideal. Gentle, soothing background noise, like soft music, can help create a peaceful atmosphere.
Cleaning and Maintenance: Keeping It Hygienic
Maintaining cleanliness is crucial for the health of the mother and her puppies. Here’s how to keep the whelping box clean and sanitary.
Sanitizing the Box
- Before Use: Clean the box with a mild, pet-safe disinfectant. Rinse thoroughly to ensure no harmful residues are left behind.
- During Use: Spot clean daily to remove soiled bedding and waste. Use gloves and dispose of waste promptly.
- After Use: Disassemble the box (if possible) and clean all surfaces with a disinfectant. Allow it to dry completely before storage.
Efficient Cleaning Routines
- Daily Checks: Quick daily checks will help you maintain cleanliness without becoming overwhelmed.
- Stock Supplies: Keep cleaning supplies, such as disposable gloves, disinfectants, and extra bedding, nearby for convenience.
- Laundry Routine: For washable bedding, establish a regular laundry routine to ensure you always have clean bedding ready.
Easy Disassembly and Storage
Choose a whelping box design that allows for easy disassembly. This not only helps with deep cleaning but also makes it convenient to store the box for future use. Labeling parts and keeping assembly instructions will make reassembly easier.
FAQs: Answers to Your Whelping Box Questions
1. My dog is small-breed. Can I build a smaller whelping box?
Absolutely! It’s crucial to size the whelping box appropriately for your dog. A too-large box can make it difficult for the mother to keep her puppies warm and secure. A general guideline is that the box should be large enough for your dog to lie down comfortably with outstretched legs and still have enough space for all her puppies to nurse simultaneously.
2. What’s the best material to build a whelping box?
Wood is a popular choice as it’s sturdy and relatively easy to work with. Plywood is a cost-effective option. Smooth, solid wood is preferable to avoid splinters or rough spots that could harm the puppies. Other options include sturdy PVC piping or even repurposed cardboard boxes for temporary use.
3. How high should the sides of the whelping box be?
The ideal height prevents puppies from climbing out as they get older but still allows the mother to easily enter and exit. For most breeds, sides around 12-18 inches are suitable. Adjust this based on your dog’s size and agility.
4. What’s the purpose of puppy rails?
Puppy rails (also called pig rails) are raised edges along the inside perimeter of the whelping box. They create a safe space where puppies can retreat if the mother dog rolls over, helping to prevent accidental crushing or suffocation.
5. How do I clean and maintain a whelping box?
Hygiene is vital! Use a pet-safe disinfectant to clean the box thoroughly before birthing. During whelping, change the bedding frequently to keep the space clean and dry. Once the puppies are weaned, disassemble the box (if possible) for deep cleaning and storage.
6. Can I make a whelping box that folds or collapses?
Yes! Collapsible whelping boxes are great for saving space when not in use. You can achieve this using hinges, PVC piping and connectors, or by designing a wood box with removable sides.
7. Where should I place the whelping box?
Choose a warm, quiet area away from drafts or busy household traffic. The mother dog needs a space where she feels safe and undisturbed to care for her newborn puppies.
Conclusion:
In wrapping up, building a DIY whelping box can make the birthing process safer and more comfortable for your dog and her new puppies. We’ve explored 3 easy dog whelping box ideas that cater to different needs, including options for larger dogs. With these guidelines, you have the tools to build a nurturing space that supports the early days of a puppy’s life.
Remember, a well-thought-out whelping box not only ensures the well-being of the mother and her litter but also gives you peace of mind. Thank you for following along, and here’s to the health and happiness of your growing dog family!
Share on Pinterest
Save money and time by sharing out these DIY Whelping Box ideas on Pinterest! Your furry friends will thank you. 🐾📌

About the Author
Sarah is an experienced veterinarian with over 10 years of practice, specialized in canine reproductive health. With a DVM from the University of Veterinary Science and a passion for dog welfare, Sarah has guided hundreds of dog births and provided care for puppies in their critical first weeks.
She combines her medical knowledge with practical DIY solutions to help dog owners safely navigate their pets’ birthing process. Jane’s insights are grounded in professional expertise, making her advice not just practical but also medically sound.
