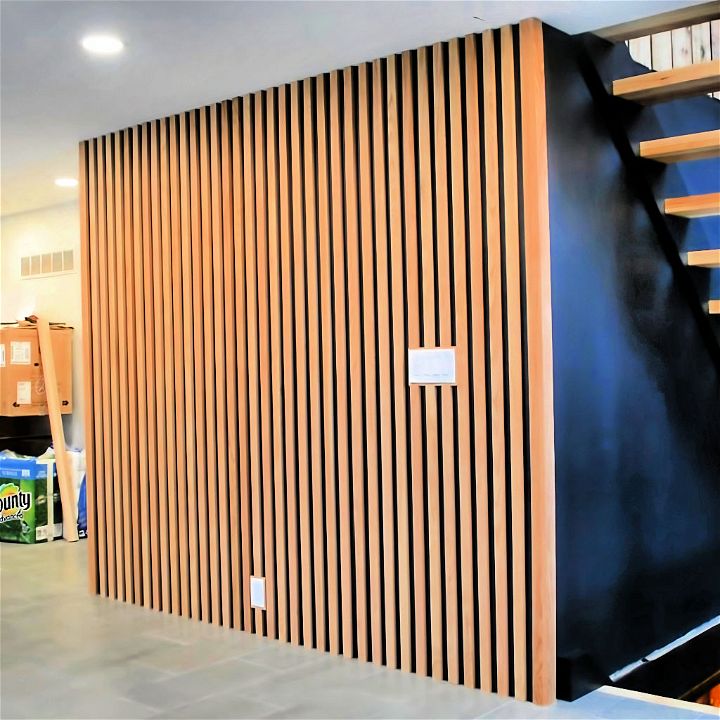
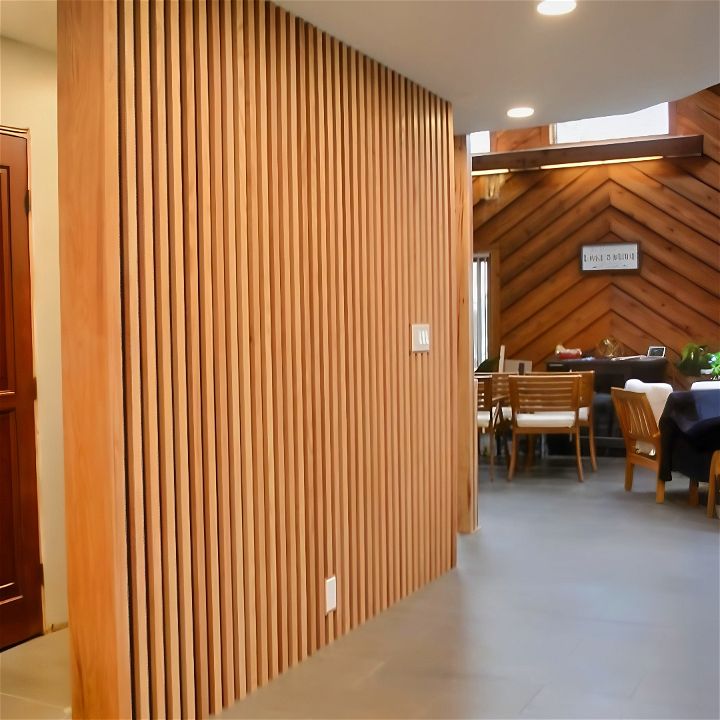
Building a wood slat wall is an excellent way to add texture, warmth, and a modern touch to any room. Whether you’re enhancing a cozy house or updating your urban apartment, this DIY slat wall project can dramatically transform your space.
In this DIY wood slat wall guide, you’ll learn from a seasoned DIYer’s firsthand experience, including unique tips learned through trial and error, how to overcome common challenges and the satisfying results you can achieve. The following instructions are designed to provide you with a clear, step-by-step process to make a stunning wood slat wall, ensuring you have all the knowledge needed to complete this project successfully.
What Will I Get Out of This?
By following this DIY wood slat wall guide, you will learn how to design, measure, cut, and install wooden slats to make a feature wall that adds depth and character to any room.
This DIY wood slat wall project caters to DIY enthusiasts looking to enhance their home’s aesthetic with a touch of modern design. Upon completion, you’ll have a visually striking wall that not only enhances the room’s appearance but also provides a sense of accomplishment from doing it yourself.

Materials and Tools Needed
- MDF Panels: For a flat, paintable surface.
- Stud Finder: To locate studs for securely attaching the MDF.
- Tape Measure and Level: For accurate measuring and alignment.
- Jigsaw and Table Saw: For cutting the MDF and wood slats.
- Drill and Screws: To attach the MDF panels to the wall.
- Wood Slats (Oak Recommended): For the aesthetic part of the project.
- Sandpaper (220 Grit): For smoothing the wood slats.
- Wood Filler and Caulk: To cover screw holes and gaps.
- Primer and Paint: To finish the wall and slats.
- Danish Oil: To protect and enhance the wood slats.
- Liquid Nails: For additional support when attaching slats.
- Pin Nailer: For attaching slats without noticeable nail heads.
Preparation
Step 1: Planning and Design
Consider the overall design of your space. Determine the dimensions of the wall you’re covering and decide on the spacing and thickness of the slats. For a balanced look, plan for slats that are 1.5 inches wide with a 1-inch gap between them, though this can be adjusted based on personal preference and the scale of the wall.
Step 2: Wall Preparation
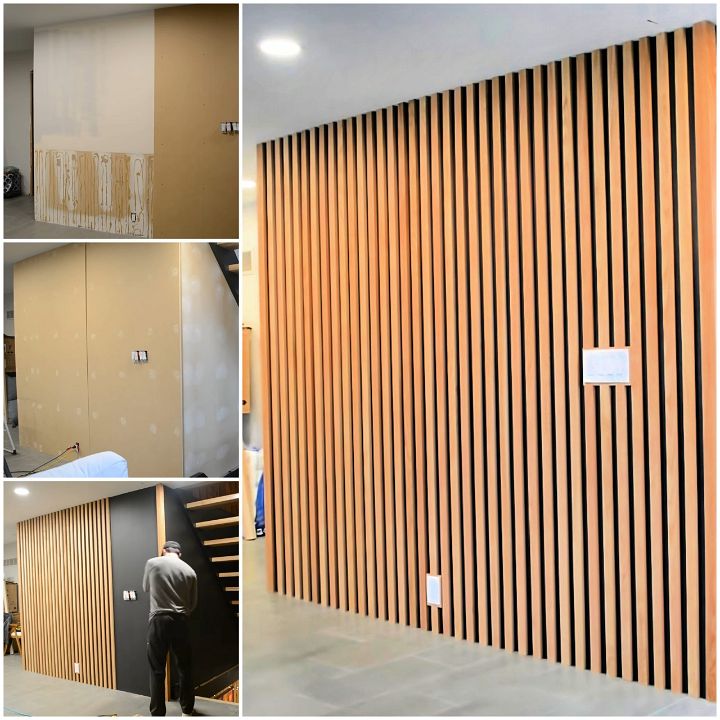
Start by removing any existing coverings or hardware from the wall. Use a stud finder to mark the locations of the studs, as this is where you will secure the MDF panels and ultimately, the wood slats. Ensure the wall is clean and smooth.
Building the Wall
Installing the MDF Panels
- Measure and Cut MDF: Measure the height and width of your wall to cut the MDF panels to size. Remember to account for any outlets or switches.
- Attach MDF to Wall: Using the marks for the studs, secure the MDF panels to the wall with screws. If you encounter any unevenness due to an old house’s quirks, scribe the panel and trim it for a perfect fit.
Cutting and Preparing Wood Slats
- Select and Cut Slats: Choose high-quality wood for the slats. Oak is recommended for its straight grain and durability. Cut the wood into 1.5-inch wide strips using a table saw. If you’re buying pre-cut slats, ensure they are smooth and uniform.
- Sand and Finish: Sand each slat with 220 grit sandpaper to smooth any rough edges. Apply Danish oil to protect the wood and bring out its natural beauty.
Painting the Wall
- Prime the MDF: Apply a grey primer to the MDF if you plan to paint your wall a dark color. This reduces the number of topcoat layers needed.
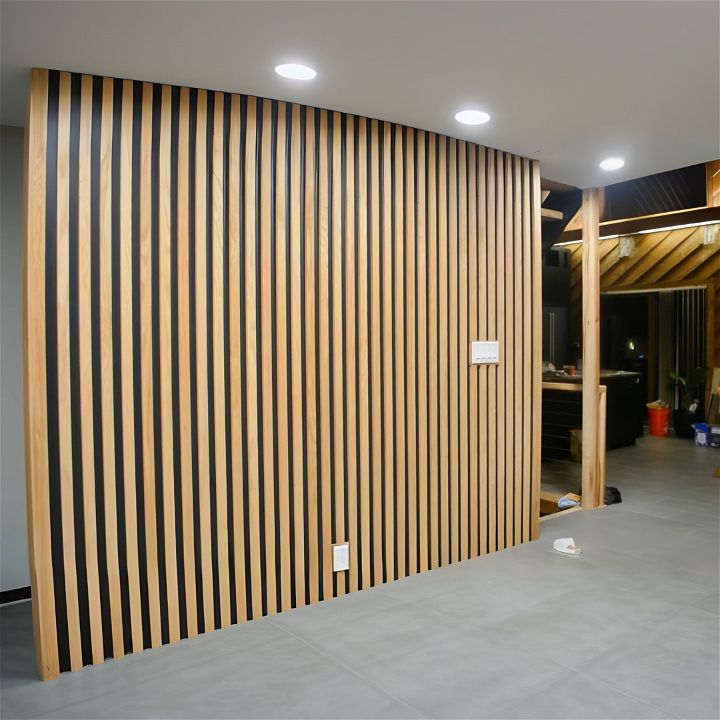
- Paint: After the primer dries, apply your chosen color. For a modern look, consider using a matte black or a deep charcoal.
Attaching the Wood Slats
- Start with a Corner: Use a thicker board at the corner for a seamless look. Ensure it’s perfectly vertical as it will guide the placement of the rest of the slats.
- Apply Adhesive: Before nailing the slats in place, apply a small amount of Liquid Nails on the back to prevent shifting.
- Space and Attach Slats: Use spacers to maintain uniform gaps between the slats. Attach them with a pin nailer for a clean look.
- Adjust for Outlets: Create custom boxes around outlets and switches, extending them out to flush with the slat surface for a seamless appearance. Measure and cut the necessary pieces, ensuring a snug fit around the electrical fixtures.
Finishing Touches
Caulk and Fill
After all the slats are securely attached, inspect the wall for any gaps or holes. Use caulk to fill in any spaces between the slats and the wall, ensuring a smooth transition. For screw holes or imperfections in the wood, wood filler can be applied and then sanded down once dry for a flawless surface.
Final Painting or Staining
If you’ve decided to add a finish to your wood slats, now is the time. Applying a final coat of Danish oil can enhance the natural grain of the wood, providing a protective layer that also adds depth to its appearance. If you prefer a more vibrant or specific color, carefully apply paint to the slats, ensuring even coverage.
Troubleshooting Common Issues
- Uneven Walls: Older homes may not have perfectly straight walls. Use a scribe to mark where the MDF or slats need to be trimmed for a snug fit.
- Slats Not Lining Up: Ensure your starting corner is perfectly vertical and use it as a guide for the rest. Regularly check with a level as you progress.
- Visible Nail Heads: If pin nails are still visible or if you prefer a completely smooth surface, use wood filler to cover the nail heads before the final sanding and finishing.
Maintenance and Care
To keep your wood slat wall looking its best, dust it regularly with a soft cloth or duster. If you’ve used a finish like Danish oil, it may need to be reapplied every few years to maintain the wood’s protection and luster. For painted slats, touch up any chips or scratches as needed to keep the wall looking fresh.
Video Tutorial
Want a visual demonstration? Watch a step-by-step video tutorial on YouTube for a detailed guide through the process. This video complements the written instructions, providing clear, easy-to-understand demonstrations of each step.
Conclusion
Building a DIY wood slat wall is a rewarding project that can elevate the aesthetic of any space. By following these detailed steps, you’re well on your way to creating a beautiful, modern feature in your home. Remember, the key to a successful project lies in careful planning, precise measurements, and patience during the installation process. Happy building!
Additional Notes:
- Take Your Time: Rushing through the steps can lead to mistakes. Ensure each slat is perfectly aligned before moving on to the next.
- Quality Materials: The choice of wood can significantly impact the final look. Select high-quality slats that are straight and free of defects.
- Safety First: Always follow safety guidelines when using power tools and handling materials.
With these tips and instructions, you’re equipped to tackle your wood slat wall project confidently. Enjoy the process and the transformation it brings to your space!
FAQs About Your DIY Wood Slat Wall Project
Learn all about DIY wood slat walls with our comprehensive FAQs guide. Find answers to your burning questions for the perfect project.
How much does a DIY wood slat wall cost?
The cost varies depending on the size of your wall, the type of wood you choose, and whether you need to buy new tools. Expect to spend anywhere from a few hundred dollars for a small accent wall to more for a large-scale project.
What kind of wood is best for a slat wall?
You have many options! Popular choices include pine (affordable), cedar (naturally weather resistant), or hardwoods like oak or maple for a more premium look.
How do I space the wood slats?
This is a design preference! Common spacing ranges from 1/2 inch to several inches apart. Experiment with different layouts to find what you like best.
Can I paint or stain the wood slats?
Absolutely! Choose a paint or stain color that complements your room’s décor. Sand the wood lightly before staining for the best finish.
How do I attach the wood slats to the wall?
You can use construction adhesive, nails, or a combination of both for a secure hold. Liquid Nails is a popular construction adhesive choice.
What if my wall isn’t perfectly flat?
You can use shims behind the slats to level them on an uneven wall. For larger gaps, consider scribing the wood to match the wall’s contours.
How do I work around outlets and light switches?
Carefully measure and cut the slats to fit around obstacles. Turn off the power to the area before making any cuts.
Can I add lighting to my wood slat wall?
Yes! LED strip lights hidden behind the slats create a beautiful ambient effect.
Is a wood slat wall difficult to maintain?
Generally, they require minimal maintenance. Dust them regularly and touch up any scratches or worn spots in the finish as needed.
Can I use wood slat walls in a bathroom?
While possible, it’s not generally recommended due to moisture exposure potentially warping the wood. If you decide to use them in a bathroom, choose a wood species known for moisture resistance and ensure excellent ventilation.
Beyond the Basics: Making Your Wood Slat Wall Unique
Wood slat walls are a timeless and attractive design choice for homes and offices. They bring warmth and texture to any space. But why stop at the basics when you can make your wood slat wall stand out even more? Here are some tips and tricks to add your unique touch and tackle common problems with creativity and ease.
Creative Finishes
Ditch the standard wood stains and get creative with your finishes. Your wall can be a reflection of your personal style.
- Two-tone patterns: By alternating the colors of your stains on different slats, you can create a captivating visual effect that adds depth to your room.
- Whitewashing or liming: This technique can give your wall a relaxed, beachy or quaintly rustic look. It’s perfect for rooms where you want to evoke calmness and comfort.
- Metallic accents: For those who love a bit of sparkle, applying gold or silver leaf on selected slats can bring a luxurious touch to the space. This works great as a focal point in your room.
Problem-Solving Designs
Every space has its quirks. Here are some solutions to common issues:
- Awkward Corners: Make those inside corners look deliberate and finished by mitering the edges of your slats. For outside corners, consider using a single slat that neatly wraps around the edge for a clean look.
- Hiding Imperfections: If your walls have seen better days, wider slats can be a savior. They’re excellent for covering up those outdated wallpaper remnants, unsightly textured walls, or minor damage without a complete overhaul.
- Adding Storage: Who couldn’t use more storage? Create functional beauty by integrating narrow shelves between slats. They’re perfect for displaying books, plants, or other decorative items.
Integrating Tech & Lighting
Modern solutions for a modern home:
- Hide Wires: Keep the sleek look of your slat wall uninterrupted by running TV, speaker, or other electronic wires behind the slats. Small, painted holes can allow cords to pass through where necessary, keeping everything neat and tidy.
- Backlighting Effects: Amplify the ambiance of your space with LED strip lighting installed discreetly behind the slats. Pair it with a smart dimmer, and you have complete control over the mood of your room, from bright and energetic to soft and serene.
Share on Pinterest
Get ready to take your home decor to the next level! Save and share this DIY project on Pinterest to inspire others to get creative with wood slats. Let’s make Pinterest walls jealous with our crafting skills!
Reader Showcase
Share photos of your unique slat wall projects! We’d love to feature some of your designs, celebrating the incredible diversity and creativity of this community. It’s a fantastic way for others to get inspired and see the multitude of ways a wood slat wall can be customized.

