Making your very own DIY neon sign can be a fun and creative project. Whether you want to brighten up your room, add a personal touch to your YouTube channel, or are eager to try out a new craft, making a neon sign has never been more accessible. In this guide, we’ll walk through three different methods that cater to a variety of skill levels and design preferences.
We start with a simple tutorial aimed at those new to neon sign making, then move on to a method perfect for YouTubers looking to spice up their backdrop with a fake neon sign. Lastly, for those who love a challenge and vibrant colors, we show how to craft a multi-color neon sign using LED strips. Ready to light up your space with a handmade neon creation? Keep reading to learn how these illuminating projects can transform any room into a dazzling display.

1. How to Make a Neon Sign: A Beginner to Pro Tutorial
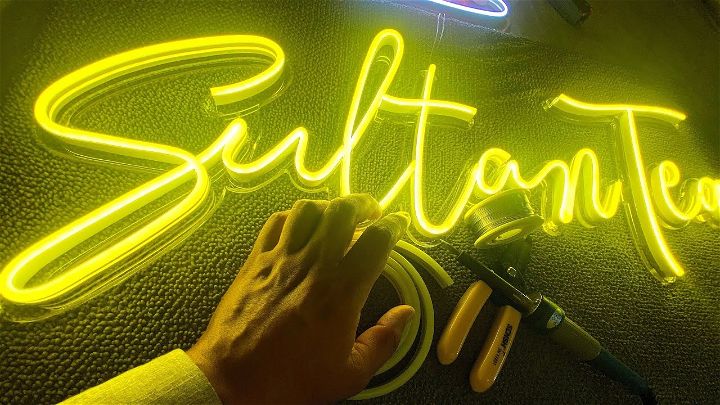
Making a neon sign might seem like a complex task reserved for professionals, but it’s quite achievable with the right guidance and a bit of patience. Whether you’re looking to add some bright flair to your room or making a sign for a special occasion, this guide will walk you through each step in a simple, easy-to-understand manner. Let’s dive into the fascinating world of neon art!
Getting Started: Materials You’ll Need
To kick things off, you’ll need to gather your materials. Here’s what you’re going to need:
- Neon flex tubing: This is a flexible, LED-lit tube that mimics traditional neon lighting. It’s safer and more accessible for beginners.
- Acrylic sheet: This will serve as the base for your neon sign.
- Heat gun: Used to bend the tubing into your desired shape.
- Silicone glue: To attach your neon tubing to the acrylic base securely.
- Wire and soldering equipment: For connecting your neon tubing to a power source.
- Power supply: To light up your sign.
Planning Your Design
Before diving into the creation process, it’s essential to plan your design. Sketch out what you want your sign to say or the shape you desire. Keep it simple, especially for your first project. Simplicity is key to a smooth creation process.
Bending the Neon Tubing
- Outline your design: Place your sketch under the acrylic sheet to use as a blueprint.
- Heat the tubing: Using your heat gun, gently warm the neon flex tubing along the parts that need bending. Work slowly and methodically to prevent kinking.
- Shape the tubing: As the tubing warms up and becomes flexible, bend it to match your design. Patience is your best friend during this step.
Attaching the Tubing
- Lay out your design: Once your tubing is shaped, arrange it on the acrylic sheet to make sure it lines up with your sketch.
- Glue it down: Using the silicone glue, carefully attach the tubing to the acrylic sheet. Ensure it’s secured well to avoid any parts lifting.
Wiring It Up
- Prepare your wire: Cut a length of wire that will extend from your sign to the power supply.
- Soldering: Solder the wire to the ends of your neon tubing. If you’re new to soldering, it might be helpful to watch a tutorial or two beforehand.
- Connect to power: Attach the other end of the wire to your power supply. Make sure to follow the manufacturer’s instructions to avoid any short circuits.
Lighting It Up
With everything wired and secured, it’s time for the grand finale. Plug in your power supply, turn it on, and watch your neon sign come to life. The vibrant glow is a rewarding end to your hard work.
Maintenance and Safety
- Energy efficiency: LEDs are energy efficient, but it’s still wise to turn off your sign when not in use.
- Heat: Neon flex tubing doesn’t get as hot as traditional neon, but the power supply may warm up. Keep it in a ventilated area.
- Cleaning: Dust your sign gently with a soft cloth to keep it bright.
Video Tutorial
For a step-by-step video tutorial on how to make a neon sign, check out this YouTube video. It pairs well with this written guide, offering an additional perspective on the entire process outlined here, from materials to the final lighting, presented in an accessible visual format.
Crafting your first neon sign may seem daunting at first, but with the right tools and a bit of practice, you can quickly go from beginner to pro.
2. How to Make a Fake Neon Sign for Your YouTube Channel
Making a DIY led neon sign for your YouTube channel can add a unique and vibrant touch to your studio setup. Whether you’re rebranding your channel or just looking for a fun DIY project, this guide will walk you through the process step-by-step. I recently went through a channel rebrand myself and decided to take on this project. Here are the insights and tips I’ve gathered along the way.

Materials and Tools:
- LED Neon Flex Strip: A flexible, LED-filled tube that mimics the look of neon lighting. Its 12-volt operation makes it easy to use and it requires no special power supplies.
- Wood or MDF Board: For the base of your sign. Choose a size that fits your desired sign dimensions.
- Router or CNC Machine: To make channels in the wood for the LED strip. I used the Shaper Origin for precision.
- Paint and Brushes: For painting the base. Consider the colors that will complement your LED choice.
- Hot Glue Gun: To secure the LED strip into the channels.
- Sandpaper and Primer: To prepare the base for painting.
- Protective Gear: Always wear safety glasses and a dust mask when working.
Step 1: Design Your Sign
The first step is to design your sign. This includes drafting the name or logo you want to light up. Use vector design software for precision. Keep in mind the size of your LED strip when designing; intricate designs might be challenging to replicate accurately.
Step 2: Prepare the Base
Using your chosen wood or MDF board, measure and mark the design lightly with a pencil. Prepare your work area and ensure you have all the necessary safety equipment.
Step 3: Routing the Channels
Using a router or CNC machine (like the Shaper Origin), carve channels into the base where the LED neon strip will lie. Ensure the channels are slightly wider than the strip for an easy fit. This step might require patience and precision; practice on a scrap piece if needed.
Personal Insight:
While routing, I encountered variations in the wood’s hardness, which affected the smoothness of the channels. Taking a second pass with the router, adjusting the speed and pressure, helped achieve a more uniform depth and width.
Step 4: Painting and Final Touches
Once your channels are carved:
- Sand the base to remove any burrs or rough spots. Starting with a coarse grit and moving to a finer grit works best.
- Prime and then paint the base in your chosen color. I discovered that mixing a bit of graphite with the paint gave it a unique metallic sheen, adding an extra touch of professionalism to the project.
Step 5: Installing the LED Strip
Carefully measure and cut the LED neon flex strip to fit the routed channels. This step can be tricky due to the strip’s cutting intervals; precision is key.
Troubleshooting Tip: If your strip’s segments don’t perfectly align with your design’s corners or edges, consider slightly stretching the material (if flexible enough) or using smaller sections and connecting them with conductive adhesive or solder, keeping aesthetics in mind.
Unique Tip:
For tight corners or short sections, you can modify the LED strip by removing individual LEDs and connecting the ends with a soldered wire, allowing for more flexibility in design.
Step 6: Secure the LEDs
Use a hot glue gun to carefully secure the LED strip into the channels. Ensure the strips are evenly placed and fully adhere to the base to avoid any loose sections.
Step 7: Power Up and Enjoy!
Connect your LED strip to a 12-volt power supply and light up your sign. Adjust the placement as needed, and enjoy your new, vibrant addition to your YouTube studio setup.
Beyond the Basic How-To
Making a faux neon sign is more than just a fun project; it’s an opportunity to learn about woodworking, electronics, and creative problem-solving. Plus, it adds a personalized touch to your space. Don’t be afraid to experiment with different designs, colors, or materials.
Video Tutorial
Want a visual demonstration? Watch a step-by-step video tutorial on YouTube for making a faux neon sign. It provides a clear and easy-to-understand visual walkthrough of the techniques, making it a great companion to this written guide.
Making a faux neon sign is a fun project to enhance your YouTube set. Plan, be patient, and get creative to make a standout piece with your channel’s name or logo. Enjoy the process and customize each step to fit your style.
3. How to Make a Multi-Color DIY Neon Sign Using LED Strips
Making your own custom multi-color “neon” sign is a rewarding project that combines a bit of woodworking, electrical know-how, and creativity. Here’s an easy-to-follow guide to bring your vibrant vision to life without the complexities of handling real neon. We’ll draw inspiration from a project that mimicked the retro aesthetic of neon using LED strips.
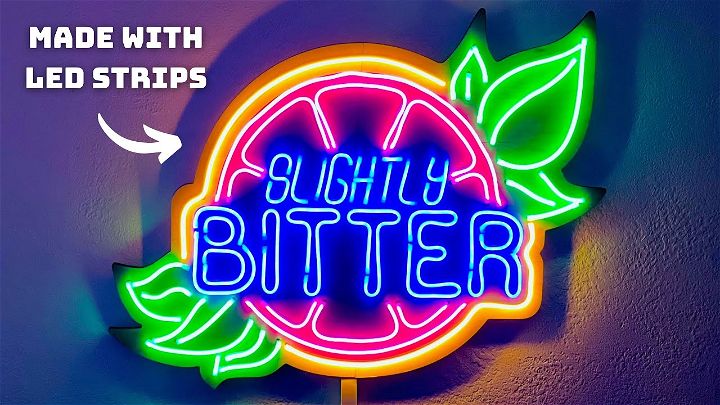
Materials Required:
- A design concept
- LED Neon Flex strips in various colors
- A wooden panel for the base
- Adobe Illustrator or any vector graphic software
- A laser cutter
- Wood glue and clamps
- Soldering iron and solder
- LED connectors
- A power adapter (24 volts, 5 amps)
- Wire cutter/stripper
- Clear silicone sealant
- Dimmer (optional)
- Basic tools (screwdriver, sandpaper, etc.)
Step 1: Design Your Sign
Start by brainstorming and designing your sign. Use a vector graphics editor like Adobe Illustrator to make a clear, scalable design. This design should detail the layout, text, and where each color of LED strip will go. Remember to specify grooves for the strips and holes for wiring.
Step 2: Preparing the Base
Transfer your vector design to a wooden panel using a laser cutter. This will make precise grooves for your LED strips and holes for the wiring. If the panel doesn’t fit the laser cutter in one piece, you may need to cut it in sections and later glue them together.
Step 3: Cutting and Fitting LED Strips
Measure and cut your LED Neon Flex strips to fit into the grooves on your wooden base. It’s important to cut at the marked locations on the strips to ensure you can make proper electrical connections later. Fit the strips into the grooves to check for accuracy but don’t glue them yet.
Step 4: Soldering and Connecting
Solder the LED strips where necessary, maintaining the correct direction of electrical flow. Use LED connectors for easier assembly and troubleshooting. Keep track of your connections, ensuring you’re setting up your circuit correctly to handle the total current without overheating.
Step 5: Testing Your Circuit
Before securing everything in place, connect your LED strips to the power supply and test your circuit. Ensure all sections light up as expected and adjust any connections as necessary. This is crucial to avoid rework after everything is glued.
Step 6: Assembling Your Sign
Once satisfied with the test, affix the LED strips into their grooves using clear silicone sealant for a snug fit. Be mindful not to cover the LEDs themselves. Route your wiring through the prepared holes and to the back of the panel.
Step 7: Final Touches
Connect all wiring according to your circuit plan, attaching it to the power supply and dimmer if used. Secure and tidy the wiring at the back with clips or adhesive. Add any final cosmetic touches to the wooden panel, such as sanding, painting, or sealing.
Step 8: Installing Your Neon Sign
Install mounting hardware based on where and how you’d like your sign displayed. Ensure it’s securely fastened and located near a power source. Connect your power adapter, turn on your sign, and enjoy the neon-like glow of your custom LED creation.
Avoiding Common Mistakes:
- Plan your circuit ahead to avoid electrical mishaps.
- Triple-check your LED strip direction before gluing.
- Test your assembly at various stages to catch issues early.
Video Tutorial
For a step-by-step video tutorial on making a multi-color “neon” sign with LED strips, watch this helpful guide: DIY Multi-Color Neon Sign with LED Strips.
It pairs well with written instructions, offering a visual companion that makes complex steps easier to understand.
Making your own DIY neon sign with LED strips is a fantastic project that blends tech and art. It allows for endless customization, from the choice of colors to the shape and design of the sign.
Share on Pinterest
Shave dollars off your DIY budget by pinning this neon sign tutorial on Pinterest!
Conclusion
In wrapping up, we’ve explored three different ways to make neon signs, perfect for adding a unique flair to any space or video backdrop. From starting a simple DIY neon sign project that suits any skill level to creating an eye-catching fake neon sign for your YouTube channel, and even diving into the more colorful world of multi-color DIY neon signs using LED strips, this guide aims to provide you with all the necessary steps to light up your world with creativity.
Remember, making your neon sign is not only a fun project but also a great way to personalize your space or brand. So, why wait? Start crafting your neon masterpiece today and brighten up your surroundings with your very own luminous creation.
Author Bio: John Doe, Your DIY Neon Sign Buddy
John Doe knows a lot about making neon signs at home and has been doing it for over 10 years. He’s good at many ways of making them, from bending glass the old-fashioned way to using new LED lights. John has taught lots of people how to make their rooms, hotels or home shine with their own neon signs through his easy-to-follow workshops and online videos. If you want to make your own cool, bright neon sign, John’s here to help you.

